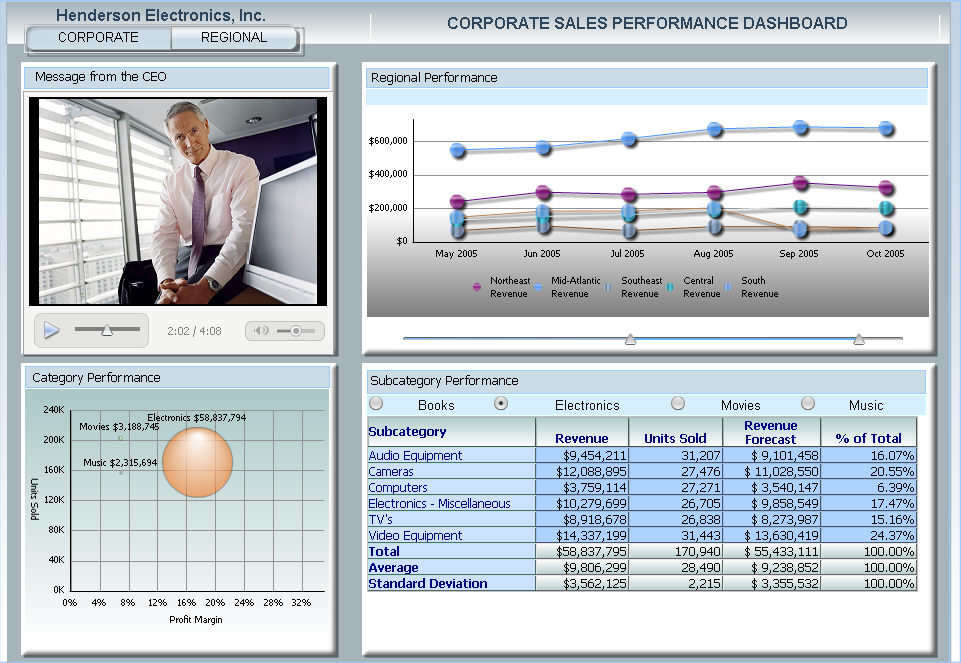
The Media widget allows you to present a variety of media, such as video, audio, images, or web site content, on your dashboard. You can include media in the widget to provide background information about data or instructions on how to use the dashboard. You can also use the Media widget to simply enhance the look and feel of a dashboard. In the following dashboard, the Media widget in the top left corner shows a company’s CEO addressing the employees on important trends in the latest figures.
One of the primary purposes of the Media widget is to present supplemental information about the data on a dashboard. For example, a regional manager can record a video that summarizes quarterly sales and discusses the significance of the data in a sales dashboard. Analysts can then view the dashboard in the context of this additional information and commentary.
The Media widget can also be used for instructional purposes. For instance, a document designer can include audio or video files that explain how to use a dashboard. Analysts can use this information to focus on key data and take advantage of the dashboard's interactive features, allowing them to work with the dashboard more efficiently.
Additionally, you can display HTML content from a web site in the widget. For example, you can display a section of your internal corporate web site that contains a business presentation. Web site content that is refreshed frequently, such as numeric indicators on system usage, can also be useful to present in the widget.
To create a Media widget, you must specify the media file to play in the widget. The media file used in the widget can come from an online source or be stored locally on your machine or remotely on the corporate network. The media is presented automatically when the dashboard is loaded. It can also be displayed on demand by selecting the Play button in the widget or by selecting a specific attribute, document, or dataset. For example, select a quarter in the document, and a manager's video about the revenue for that quarter is displayed. Similarly, you can choose a region to play a video about the performance of the stores in that particular region.
Note: To use a graphic, video, or audio clip that is available on your network, ensure that the file has the required view or access privileges. In addition, if your machine is running Microsoft Windows 2003 SP2 (R2) and Microsoft Internet Information Services (IIS) 6, you must add .flv files to the Multipurpose Internet Mail Extension (MIME) types in IIS Manager. For instructions and more details, see Configuring IIS 6 in Microsoft Windows 2003 SP2 (R2) to display Flash video.
Unlike some other widgets, the Media widget does not require attributes or metrics on the Grid/Graph that contains the widget, unless you define the widget as a target of an attribute selector in the dashboard. For details, see Viewing media related to a specific attribute, document, or dataset.
The Media widget can only play and display the file formats listed in the following table.
|
Media Type |
Format |
|
Video |
|
|
Audio |
|
|
Graphic |
|
Only specific HTML tags are supported by the Media widget. These HTML tags include the following:
Anchor tag (<A>)
Bold tag (<B>)
Break tag (<BR>)
Image tag (<IMG>)
Italic tag (<I>)
List item tag (<LI>)
Paragraph tag (<P>)
Underline tag (<U>)
The following HTML tags are not rendered in the widget, but content within the tags is displayed:
<TABLE>
<TR>
<TD>
<DIV>
<FONT>
Note: The <FONT> tag may be removed if it contains
a CLASS attribute within it.
For example:
<font class="header">Welcome</font>.
The following HTML tags and any content within the tags are not rendered in the widget:
<SCRIPT>
<STYLE>
<SPAN>
Warning: The third-party products discussed in the procedures below are manufactured by vendors independent of MicroStrategy. MicroStrategy makes no warranty, express, implied, or otherwise, regarding these products, including their performance or reliability.
Open the document in Design or Editable mode.
From the Insert menu, point to Widgets, then Flash. Select Media.
Click the location on your document where you want to place the widget (you cannot place the widget in the Detail section). The Grid/Graph, which appears similar to a standard grid container, is displayed. A small icon at the bottom right corner of the Grid/Graph identifies the type of widget you have added to the document.
If desired, resize the widget by clicking and dragging its handles.
To enable the widget to be displayed
Enable the widget to be viewed in one of two ways:
Select Flash Mode from the Home menu.
If Flash Mode is not available in the Home menu, you must make Flash Mode available in the document. For steps, see Defining which display modes are available to users.
Select Interactive Mode from the Home menu.
The widget must be enabled to be displayed in non-Flash mode to be viewable in Interactive Mode. For instructions to allow a widget to be displayed in non-Flash mode, see Determining how a widget is rendered in non-Flash modes.
To specify the media content to display in the widget
As the document designer or administrator, you must specify the media content to present in the widget. You can also specify the play frequency options for the widget.
Right-click the widget and select Properties. The Properties dialog box opens.
On the General tab, from the Content Type drop-down list, choose the type of media to present by selecting Video, Audio, Web Content, or Image. Only specific video, audio, and image file formats are supported in the Media widget.
Specify the location of the content in the Default Feed field. You must enter "www" in the Default Feed field to ensure that the web site opens in the media widget.
If the media is stored on a network location or web site, specify the network location of the file or web site’s URL using the following format: http://www.mycompany.com/SalesVideos/South.swf
Folder paths in the form of \\corp_djohnson\videos\South.swf cannot be used to define a Media widget.
To display media for a specific attribute, document, or dataset, you must specify a dynamic path that includes the name of the object. See Playing media related to a specific attribute for more details.
Use a + character to include a space between words. For example, http://www.mycompany.com/videos/Books+Electronics+Music+Movies.
If you selected Web Content above and the Web content is located on a different Web domain than the one used for MicroStrategy Web, select the Use Proxy check box.
If you want to display a tooltip, enter text in the Tooltip Text text box. For details on tooltips, see Creating Pop-up tooltips.
Select the background color from the Background color drop-down list.
If you want a popup to appear when you execute the widget, select the Popup content when clicked check box.
To determine how the popup is displayed, from the Display Window drop-down list select Inline or New Window.
Enter text for the popup button in the Button Text text box.
On the Play Frequency tab, you can determine the following play options:
To
display the Play button in the
widget, select the Show play button control
check box.
Note: If the Play
button is not displayed, the media cannot be controlled by the user.
To play the media file automatically when the dashboard is loaded, select the Auto Play on Start check box.
From the drop-down list, select Continuous Play (Loop) to play the video continuously in a loop or select Play Once to play the video only once.
Click OK to save changes and display the widget.
To play media related to a specific attribute, you must specify the name of the attribute when you specify the location of the media file. For example, several sales videos on your corporate web site are devoted to different store locations; the sales videos are named East.swf, West.swf, and Northeast.swf. Specify the location of the video files in this format: http://www.example.com/videos/{[Region]}.swf. This ensures that different elements from the Region attribute, such as Northeast or West, trigger specific videos to play. Because the video's URL is dynamic, it displays a video corresponding to the attribute element you select.
You can also play media files related to a document or dataset report by inserting the document or dataset report name in the URL or folder location in the following format: {[#name of document#]} or {[#name of dataset#]}.
Follow the guidelines below to display media related to a specific attribute, document, or dataset report:
Attribute names: Use the following format to specify the name of an attribute: {[name of attribute]}. For example, to display a video related to a specific marketing campaign, you can use the following format: http://www.example.com/MarketingCampaignVideos/{[Campaign]}.swf
Use a + character to separate the names of different attributes or attribute elements. For example, if you are using a selector to filter the Store and Zip Code attributes, use the following format: http://www.example.com/videos/{[Store]+[ZipCode]}
Document or dataset report names: Use the following format to specify the name of a document or dataset report: {[#name of document#]} or {[#name of dataset#]}
If your machine is running Microsoft Windows 2003 SP2 (R2) and Microsoft Internet Information Services (IIS) 6, you must add .flv files to the Multipurpose Internet Mail Extension (MIME) types in IIS Manager. If you do not modify the MIME types in IIS, the Media widget cannot function properly in this environment. If your machine is operating in a different environment, this procedure is not required.
If you are exporting a dashboard that contains a Media widget to a machine with no internet access, you must add the .MHT file to the list of Adobe Flash Player trusted files on the client machine. The .MHT file contains all of the data required to make a widget that is displayed in Flash mode function properly after it has been exported. For more information about exporting documents, see Exporting a Document.
Warning: The third-party products discussed below are manufactured by vendors independent of MicroStrategy, and the information provided is subject to change. Refer to the appropriate third-party vendor documentation for updated Flash Player support information.
To enable a media widget to play Flash video when used offline
Access the Macromedia support site at http://www.macromedia.com/support/documentation/en/flashplayer/help/settings_manager04.html.
From the Edit locations drop-down menu on the right, select Add location.
Type the location of the .MHT file in the textbox.
Click Confirm.
Close and reopen the dashboard or document that contains the widget.
Related topics
Inserting a widget into a document