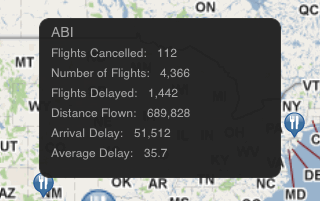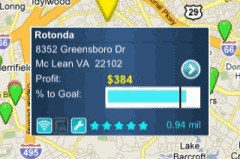
When a user selects a map marker in a Map widget, an informational window with a default layout is displayed. This Information Window provides additional details about the location, such as the name of the location and related metric values, as shown in the image below.

You can create and format a custom Information Window to display, as shown in the image below.

To create a custom Information Window for:
A Map
widget displayed on the iPhone, you must create a document layout, enable
the layout to be displayed as an Information Window, and specify the layout
as the Information Window in the Map widget's properties. Layouts
enabled as an Information Window are not displayed with the other layouts
in a document, and will only be displayed as Information Windows.
If you define an Information Window in a separate document, you can
import the document when creating a new layout. This allows you to reuse
the same Information Window layout in multiple documents.
A Map widget displayed on the iPad, you must create a panel stack, then enable the location attribute on the rows of the widget's Grid/Graph as a selector that targets the panel stack. For more information and steps, see To define a custom Information Window for a Map widget displayed on the iPad.
Once you have created the layout or panel stack to use to display the Information Window, you can add content to this layout or panel stack to be displayed in the widget. You can add any controls to the layout or panel stack, including text fields, Grid/Graphs, images, shapes, and so on. For an overview of controls that can be added, see About creating documents. The container that displays the Information Window on the iPhone is 1.5 inches wide. Its height is defined to fit to the content, with a maximum height of 1 inch.
The following are suggestions for controls to add to an Information Window:
Images, such as corporate logos or buttons
Data fields to display information about attributes and metrics in the documents, or other details. For example, you can add the {Store@Name} data field to an Information Window. When the store location is selected in the widget, as shown in the image above, the Information Window displays the name of the store. For a detailed explanation of data fields, see Adding data fields to a document.
Links to iPhone or iPad applications, such as a link to call the phone number of a selected store. For steps to add a link to an iPhone or iPad application, see Opening iPhone or iPad applications in documents.
Links to other reports or documents. For steps, see Linking to documents and reports from an iPhone or iPad document.
This procedure assumes you have already defined a Map widget in a document.
Open the document in Design or Editable mode.
From the Insert menu, select Layout. The Insert Layout dialog box opens.
Do one of the following to create the new layout:
To use a dashboard template to create the layout, click the Dashboard Layouts tab, then select a template.
To use a document template to create the tab, click the Document Layouts tab, then select a template. You can select the iPhone Map Information Window template to quickly create a blank layout designed for use as an Information Window.
To create the new layout using a saved document, click the Browse Documents tab, then select a previously saved document.
Note: You can create your own document or dashboard templates by saving a document in the Object Templates\Documents (for documents) or Object Templates\Dashboard (for dashboards) directory in Desktop. For detailed steps to save a document as a template, see the Desktop Help.
Click OK. The new layout is displayed.
To display specific information about a location when the user selects its map marker in the widget, you must group the data in the layout by the Map widget's location attribute. In the Dataset Objects panel, right-click the attribute that provides the location information for the map markers in the widget, then select Add to Grouping. For steps and an explanation of grouping data in a document, see Grouping records in a document.
Add content to the layout
Add content to this layout to be displayed
in the Information Window. You can add any controls to the layout, including
text fields, Grid/Graphs, images, shapes, and so on. For an overview of
controls that can be added to an Information Window, see
About
creating documents. The container that displays the Information Window
on the iPhone is 1.5 inches wide. Its height is defined to fit to the
content, with a maximum height of 1 inch.
The following are suggestions for controls to add to an Information
Window:
Images, such as corporate logos or buttons
Data fields to display information about attributes and metrics in the documents, or other details. For example, you can add the {Store@Name} data field to an Information Window. When the store location is selected in the widget, as shown in the image above, the Information Window displays the name of the store. For a detailed explanation of data fields, see Adding data fields to a document.
Links to iPhone or iPad applications, such as a link to call the phone number of a selected store. For steps to add a link to an iPhone or iPad application, see Opening iPhone or iPad applications in documents.
Links to other reports or documents. For steps, see Linking to documents and reports from an iPhone or iPad document.
Enable the layout to be displayed as an Information Window
From the Tools menu, select Document Properties. The Properties dialog box opens.
From the Layout Properties section on the left, click Mobile, then select the Use as Information Window check box.
Click OK. The layout is enabled as an Information Window.
Specify the Information Window layout to be displayed in the Map widget's properties
Select the tab of the layout that contains the Map widget, then right-click the widget. Select Properties and Formatting. The Properties and Formatting dialog box opens.
From the left, select Widget.
Click the Widget
Properties icon  . The Map Properties dialog box opens.
Select the Display Information Window from document layout check box.
From the Select Layout to use drop-down list, select the name of the layout to use as the Information Window.
Click OK to apply changes and return to the Properties and Formatting dialog box.
Click OK again to apply changes and return to the document.
This procedure assumes you have already defined a Map widget in a document.
Open the document in Design or Editable Mode.
From the Insert menu, select Panel Stack.
Click the location on your document, except for the Detail section, where you want to place the panel stack. The panel stack is added to the document.
Add content to the panel stack, such
as images and data fields. For more information on adding content to a
panel stack, as well as steps to format the panel stack, see
Inserting
a panel stack into a document.
The following are suggestions for controls to add to an Information
Window:
Images, such as corporate logos or buttons
Data fields to display information about attributes and metrics in the documents, or other details. For example, you can add the {Store@Name} data field to an Information Window. When the store location is selected in the widget, as shown in the image above, the Information Window displays the name of the store. For a detailed explanation of data fields, see Adding data fields to a document.
Links to iPhone or iPad applications, such as a link to call the phone number of a selected store location. For steps to add a link to an iPhone or iPad application, see Opening iPhone or iPad applications in documents.
Links to other reports or documents. For steps, see Linking to documents and reports from an iPhone or iPad document.
Right-click the panel stack, then select Properties and Formatting. The Properties and Formatting dialog box is displayed.
From the list of categories on the left, select General.
Select the Use as Information Window for template selectors (iPad only) check box.
Click OK to return to the document.
From the rows of the widget's Grid/Graph, right-click the attribute that provides the location information for items displayed in the widget, then select Use as Selector. By default, the selector automatically targets all Grid/Graphs and panel stacks in the current panel or section of the document. The selector must target the panel stack that will be used as the Information Window. If it does not, you can disable automatic target maintenance and choose targets manually. For more information on automatically maintaining selector targets, see Automatically maintaining targets for selectors.
Related topic