The Fish Eye Selector is an interactive style of selector that is displayed only in Flash Mode. It is a selector that magnifies an item when you hover the cursor over it. This style of selector is useful because it allows you to choose from a large list of attribute elements, metrics, or images without having to see all of the elements, metrics, or images displayed at once. Any item that you hover over or select remains magnified, while the remaining items are minimized and hidden from view.
If a Fish Eye Selector is created as a widget, the selector can be displayed as a Grid/Graph, which still functions as a selector, in non-Flash modes in MicroStrategy Web. A Fish Eye Selector created as a widget can target Grid/Graphs and panel stacks, but cannot switch panels on a panel stack. (For more information on Grid/Graphs controlling panel stacks or other Grid/Graphs, see Enabling a Grid/Graph to control another Grid/Graph.) If you want the Fish Eye Selector to switch panels or display as a standard selector such as a listbox or button bar in non-Flash modes, create it as a selector instead. For instructions, see Creating a Fish Eye Selector as a selector.
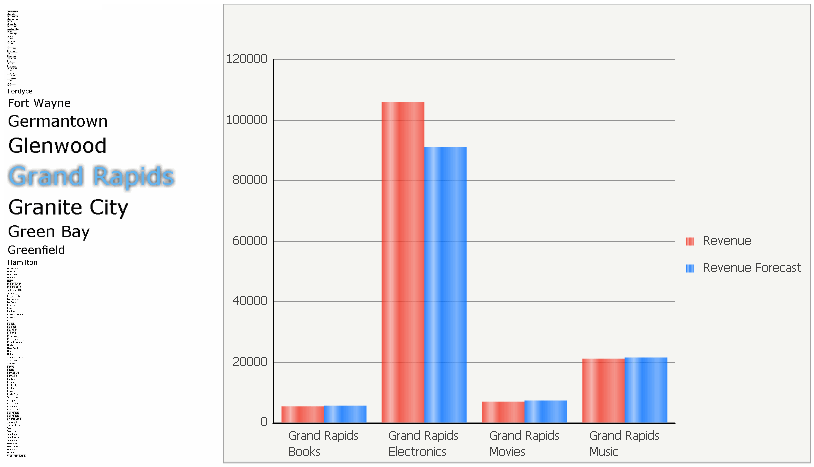
The image below depicts a Fish Eye Selector to the left of a grid that it controls. When the Grand Rapids city is chosen from the selector, the target grid on the right displays data for Grand Rapids.
Open the document in Design or Editable mode.
From the Insert menu, point to Widgets, then Flash. Select Fish Eye.
Click
the location on your document, except for in the Detail
section, where you want to place the widget. The Grid/Graph, which appears
similar to a standard grid container, is displayed. A small icon at the
bottom right corner of the Grid/Graph identifies the type of widget you
have added to the document.
Note: The selector is displayed in its default DHTML style.
If desired, resize the widget by clicking and dragging its handles.
Right-click the selector, and select Properties. The Properties dialog box opens.
From the left, click Selector.
In the Action Type drop-down list, do one of the following:
To display attribute, custom group, or consolidation elements in the widget, choose Select Element. The elements of the object are displayed in the Fish Eye Selector. Users can choose from this list of elements to update target panel stacks and Grid/Graphs in the document.
If you choose Select Element, in the next step, you must specify an attribute, custom group, or consolidation as the source of the selector.
To display metric names in the widget, choose Select Metric. The metric names are displayed in the Fish Eye Selector. Users can choose from this list to update target Grid/Graphs in the document.
To display panels in the widget, choose Select Panel. The panels names are displayed in the Fish Eye Selector. Users can choose from this list to update target panel stacks in the document.
If you chose Select Element from the Action Type drop-down list above, specify a source attribute, custom group, or consolidation from the Source drop-down list. The source is the object whose elements are displayed in the selector.
From the DHTML Style drop-down list, choose the style in which the selector is displayed in Editable, Interactive, and Express Mode.
Choose Fish Eye from the Flash Style drop-down list.
Specify
additional options for the selector, as necessary.
Note: The widget does not support multiple selections
in Flash Mode. If the Allow multiple
selections check box is selected, multiple selections are
enabled only in Editable Mode and Interactive Mode.
Choose targets for the selector. Targets are panel stacks and Grid/Graphs that contain the selector’s source attribute, custom group, or consolidation and will be updated when an element is selected from the Fish Eye Selector.
Click OK to apply the changes.
To view and test the widget
View and test your results in one of two ways:
Select Flash Mode from the Home menu.
If Flash Mode is not available, you must make Flash Mode available in the document. For steps, see Defining which display modes are available to users.
Select Interactive Mode from the Home menu.
The widget must be enabled to be displayed in non-Flash modes to be viewable in Interactive Mode. For instructions to allow a widget to be displayed in non-Flash mode, see Determining how a widget is rendered in non-Flash modes.
Related topics